iOS开发UI篇—从代码的逐步优化看MVC
一、要求
要求完成下面一个小的应用程序。

二、一步步对代码进行优化
注意:在开发过程中,优化的过程是一步一步进行的。(如果一个人要吃五个包子才能吃饱,那么他是否直接吃第五个,前面四个不用吃就饱了?)
1.完成基本要求的代码(使用了字典转模型和xib连线)
(1)文件结构

(2)主要代码
字典转模型部分:
YYappInfo.h头文件
1 // 2 // YYappInfo.h 3 // 12-视图改进(1) 4 // 5 // Created by apple on 14-5-25. 6 // Copyright (c) 2014年 itcase. All rights reserved. 7 // 8 9 #import10 11 @interface YYappInfo : NSObject12 @property(nonatomic,copy)NSString *name;13 @property(nonatomic,copy)NSString *icon;14 @property(nonatomic,strong,readonly)UIImage *img;15 16 -(instancetype)initWithDict:(NSDictionary *)dict;17 /**工厂方法*/18 +(instancetype)appInfoWithDict:(NSDictionary *)dict;19 @end
YYappInfo.m文件
1 // 2 // YYappInfo.m 3 // 12-视图改进(1) 4 // 5 // Created by apple on 14-5-25. 6 // Copyright (c) 2014年 itcase. All rights reserved. 7 // 8 9 #import "YYappInfo.h"10 @interface YYappInfo()11 {12 UIImage *_img;13 }14 @end15 @implementation YYappInfo16 -(instancetype)initWithDict:(NSDictionary *)dict17 {18 if (self=[super init]) {19 self.name=dict[@"name"];20 self.icon=dict[@"icon"];21 }22 return self;23 }24 25 +(instancetype)appInfoWithDict:(NSDictionary *)dict26 {27 return [[self alloc]initWithDict:dict];28 }29 30 -(UIImage *)img31 {32 _img=[UIImage imageNamed:self.icon];33 return _img;34 }35 @end xib部分(YYappInfoView.h文件):
注:(xib视图和YYappInfoView进行了关联,三个属性均进行了连线)
1 // 2 // YYappInfoView.h 3 // 12-视图改进(1) 4 // 5 // Created by apple on 14-5-25. 6 // Copyright (c) 2014年 itcase. All rights reserved. 7 // 8 9 #import10 11 @interface YYappInfoView : UIView12 @property (strong, nonatomic) IBOutlet UIImageView *appInfoViewimg;13 14 @property (strong ,nonatomic) IBOutlet UILabel *appInfoViewlab;15 @property (strong, nonatomic) IBOutlet UIButton *appInfoViewbtn;16 17 @end
主要功能实现部分:
YYViewController.m文件
1 // 2 // YYViewController.m 3 // 12-视图改进(1) 4 // 5 // Created by apple on 14-5-25. 6 // Copyright (c) 2014年 itcase. All rights reserved. 7 // 8 9 #import "YYViewController.h"10 #import "YYappInfo.h"11 #import "YYappInfoView.h"12 13 @interface YYViewController ()14 @property(nonatomic,strong)NSArray *apps;15 @end16 17 //开发思路18 //1.加载plist文件(字典转模型提供接口)19 //2.使用xib文件完成单个的view20 //3.计算坐标,使用for循环把view展现到界面上21 //4.优化代码22 @implementation YYViewController23 24 //get方法,懒加载25 -(NSArray *)apps26 {27 if (!_apps) {28 NSString *path = [[NSBundle mainBundle]pathForResource:@"app.plist" ofType:nil];29 NSArray * arrayM = [NSArray arrayWithContentsOfFile:path];30 31 NSMutableArray *appinfoarray=[NSMutableArray array];32 for (NSDictionary *dict in arrayM) {33 [appinfoarray addObject:[YYappInfo appInfoWithDict:dict]];34 }35 _apps = appinfoarray;36 }37 return _apps;38 }39 40 - (void)viewDidLoad41 {42 [super viewDidLoad];43 NSLog(@"%d",self.apps.count);44 45 int totalloc = 3;46 CGFloat appviewW = 80;47 CGFloat appviewH = 90;48 CGFloat margin = (self.view.frame.size.width-totalloc*appviewW)/(totalloc+1);49 50 int count=self.apps.count;51 for (int i = 0; i < count; i++) {52 int row = i/totalloc;53 int loc = i%totalloc;54 55 CGFloat appviewX = margin + (margin + appviewW) * loc;56 CGFloat appviewY = margin + (margin + appviewH) * row;57 58 YYappInfo *appinfo=self.apps[i];59 60 //拿出xib中的数据61 NSArray *arryM=[[NSBundle mainBundle]loadNibNamed:@"appInfoxib" owner:nil options:nil];62 YYappInfoView *appinfoview=[arryM firstObject];63 //设置位置64 appinfoview.frame=CGRectMake(appviewX, appviewY, appviewW, appviewH);65 //设置值66 appinfoview.appInfoViewimg.image=appinfo.img;67 appinfoview.appInfoViewlab.text=appinfo.name;68 //添加到视图69 appinfoview.appInfoViewbtn.tag=i;70 [appinfoview.appInfoViewbtn addTarget:self action:@selector(Click:) forControlEvents:UIControlEventTouchUpInside];71 [self.view addSubview:appinfoview];72 }73 }74 -(void)Click:(UIButton *)btn75 {76 btn.enabled=NO;77 YYappInfo *appinfo=self.apps[btn.tag];78 UILabel *lab=[[UILabel alloc]initWithFrame:CGRectMake(60, 450, 200, 20)];79 [lab setBackgroundColor:[UIColor lightGrayColor]];80 [lab setTextAlignment:NSTextAlignmentCenter];81 [lab setText:[NSString stringWithFormat:@"%@成功下载",appinfo.name]];82 [self.view addSubview:lab];83 84 lab.alpha=1.0;85 [UIView animateWithDuration:2.0 animations:^{86 lab.alpha=0;87 }completion:^(BOOL finished) {88 [lab removeFromSuperview];89 }];90 }91 @end 2.对1进行优化(把数据呈现部分封装到视图)
说明:在1的基础上寻找还会有那些可以优化的部分
1)改进思路:
(1)1中主文件的66~67行对控件属性的设置能否拿到视图中进行?
(2)1中61~62行是从xib文件中读取信息的操作,且和主控制器没有什么太大的关联,能否把它也封装到视图中进行?
(3)当上述两个步骤完成后,主文件69行以后的按钮操作和按钮单击事件就显得很突兀,放在主控制器中已经不再合适,是否可以把它放到视图中进行处理
2)按照上述思路优化后的代码如下:
优化视图,在视图部分之对外提供一个接口,把数据的处理封装在内部
YYappInfoView.h文件代码:
1 // 2 // YYappInfoView.h 3 // 12-视图改进(1) 4 // 5 // Created by apple on 14-5-25. 6 // Copyright (c) 2014年 itcase. All rights reserved. 7 // 8 9 #import10 @class YYappInfo;11 @interface YYappInfoView : UIView12 13 //读取14 //+(instancetype)appInfoView;15 //只对外开放一个数据接口16 +(instancetype)appInfoViewWithappInfo:(YYappInfo *)appinfo;17 @end
YYappInfoView.m文件代码
说明:该文件中的属性和click等均已做了连线的操作。
1 // 2 // YYappInfoView.m 3 // 12-视图改进(1) 4 // 5 // Created by apple on 14-5-25. 6 // Copyright (c) 2014年 itcase. All rights reserved. 7 // 8 9 #import "YYappInfoView.h"10 #import "YYappInfo.h"11 //私有扩展,把属性拿进来12 @interface YYappInfoView ()13 @property (strong, nonatomic) IBOutlet UIImageView *appInfoViewimg;14 @property (strong ,nonatomic) IBOutlet UILabel *appInfoViewlab;15 @property (strong, nonatomic) IBOutlet UIButton *appInfoViewbtn;16 @property(strong,nonatomic)YYappInfo *appinfo;17 18 @end19 @implementation YYappInfoView20 21 +(instancetype)appInfoView22 {23 NSArray *arryM=[[NSBundle mainBundle]loadNibNamed:@"appInfoxib" owner:nil options:nil];24 YYappInfoView *appinfoview=[arryM firstObject];25 return appinfoview;26 }27 28 +(instancetype)appInfoViewWithappInfo:(YYappInfo *)appinfo29 {30 YYappInfoView *appInfoView=[self appInfoView];31 appInfoView.appinfo=appinfo;32 return appInfoView;33 }34 35 -(void)setAppinfo:(YYappInfo *)appinfoc36 {37 //这里一定要记录变化38 _appinfo=appinfoc;39 self.appInfoViewimg.image=appinfoc.img; self.appInfoViewlab.text=appinfoc.name; 41 }
42 - (IBAction)Click {43 44 self.appInfoViewbtn.enabled=NO;45 //YYappInfo *appinfo=self.apps[];46 47 YYappInfo *appinfo=self.appinfo;48 UILabel *lab=[[UILabel alloc]initWithFrame:CGRectMake(60, 450, 200, 20)];49 [lab setBackgroundColor:[UIColor lightGrayColor]];50 [lab setTextAlignment:NSTextAlignmentCenter];51 [lab setText:[NSString stringWithFormat:@"%@成功下载",appinfo.name]];52 //把lab添加到父视图(即view中)53 [self.superview addSubview:lab];54 55 lab.alpha=1.0;56 [UIView animateWithDuration:2.0 animations:^{57 lab.alpha=0;58 }completion:^(BOOL finished) {59 [lab removeFromSuperview];60 }];61 }62 63 64 @end 优化后的主控制器部分
YYViewController.m文件代码
1 // 2 // YYViewController.m 3 // 12-视图改进(1) 4 // 5 // Created by apple on 14-5-25. 6 // Copyright (c) 2014年 itcase. All rights reserved. 7 // 8 9 #import "YYViewController.h"10 #import "YYappInfo.h"11 #import "YYappInfoView.h"12 13 @interface YYViewController ()14 @property(nonatomic,strong)NSArray *apps;15 @end16 @implementation YYViewController17 18 -(NSArray *)apps19 {20 if (!_apps) {21 NSString *path = [[NSBundle mainBundle]pathForResource:@"app.plist" ofType:nil];22 NSArray * arrayM = [NSArray arrayWithContentsOfFile:path];23 24 NSMutableArray *appinfoarray=[NSMutableArray array];25 for (NSDictionary *dict in arrayM) {26 [appinfoarray addObject:[YYappInfo appInfoWithDict:dict]];27 }28 _apps = appinfoarray;29 }30 return _apps;31 }32 33 - (void)viewDidLoad34 {35 [super viewDidLoad];36 NSLog(@"%d",self.apps.count);37 38 int totalloc = 3;39 CGFloat appviewW = 80;40 CGFloat appviewH = 90;41 CGFloat margin = (self.view.frame.size.width-totalloc*appviewW)/(totalloc+1);42 43 int count=self.apps.count;44 for (int i = 0; i < count; i++) {45 int row = i/totalloc;46 int loc = i%totalloc;47 48 CGFloat appviewX = margin + (margin + appviewW) * loc;49 CGFloat appviewY = margin + (margin + appviewH) * row;50 51 /*思路:52 要达到的效果 appinfoview.appinfo=appinfo;53 优化后即变成 appinfoview.appinfo=self.apps[i];54 要进行上面代码的操作,需要在视图中新增加一个appinfo类的属性,这样数据——》视图的转换即可以不需要在主控制器中完成,让程序结构一目了然55 */56 YYappInfo *appinfo=self.apps[i];57 YYappInfoView *appinfoview=[YYappInfoView appInfoViewWithappInfo:appinfo];58 //设置位置59 appinfoview.frame=CGRectMake(appviewX, appviewY, appviewW, appviewH);60 //添加61 [self.view addSubview:appinfoview];62 }63 }64 @end 3.对2进一步优化(把数据处理部分拿到模型中去进行)
(1)思路:把字典转模型部分的数据处理操作,拿到模型中去处理,这样外界不需要再关心数据处理的内部细节。
(2)优化后的代码如下
YYappInfo.h文件中向外开放一个接口,返回一个处理好的数组。
1 // 2 // YYappInfo.h 3 // 12-视图改进(1) 4 // 5 // Created by apple on 14-5-25. 6 // Copyright (c) 2014年 itcase. All rights reserved. 7 // 8 9 #import10 11 @interface YYappInfo : NSObject12 @property(nonatomic,copy)NSString *name;13 @property(nonatomic,copy)NSString *icon;14 @property(nonatomic,strong)UIImage *img;15 16 -(instancetype)initWithDict:(NSDictionary *)dict;17 /**工厂方法*/18 +(instancetype)appInfoWithDict:(NSDictionary *)dict;19 +(NSArray *)appinfoarray;20 @end
YYappInfo.m文件中的数据处理
1 // 2 // YYappInfo.m 3 // 12-视图改进(1) 4 // 5 // Created by apple on 14-5-25. 6 // Copyright (c) 2014年 itcase. All rights reserved. 7 // 8 9 #import "YYappInfo.h"10 @interface YYappInfo()11 @end12 @implementation YYappInfo13 -(instancetype)initWithDict:(NSDictionary *)dict14 {15 if (self=[super init]) {16 self.name=dict[@"name"];17 self.icon=dict[@"icon"];18 }19 return self;20 }21 22 +(instancetype)appInfoWithDict:(NSDictionary *)dict23 {24 return [[self alloc]initWithDict:dict];25 }26 27 -(UIImage *)img28 {29 _img=[UIImage imageNamed:self.icon];30 return _img;31 }32 33 //把数据处理部分拿到模型中来处理34 +(NSArray *)appinfoarray35 {36 NSString *path = [[NSBundle mainBundle]pathForResource:@"app.plist" ofType:nil];37 NSArray * arrayM = [NSArray arrayWithContentsOfFile:path];38 39 NSMutableArray *appinfoarray=[NSMutableArray array];40 for (NSDictionary *dict in arrayM) {41 [appinfoarray addObject:[YYappInfo appInfoWithDict:dict]];42 }43 return appinfoarray;44 }45 @end 主控制器中不再需要关心数据处理的内部细节
YYViewController.m文件现在只是负责模型和视图之间的协调工作了,怎么样?差不多了吧。
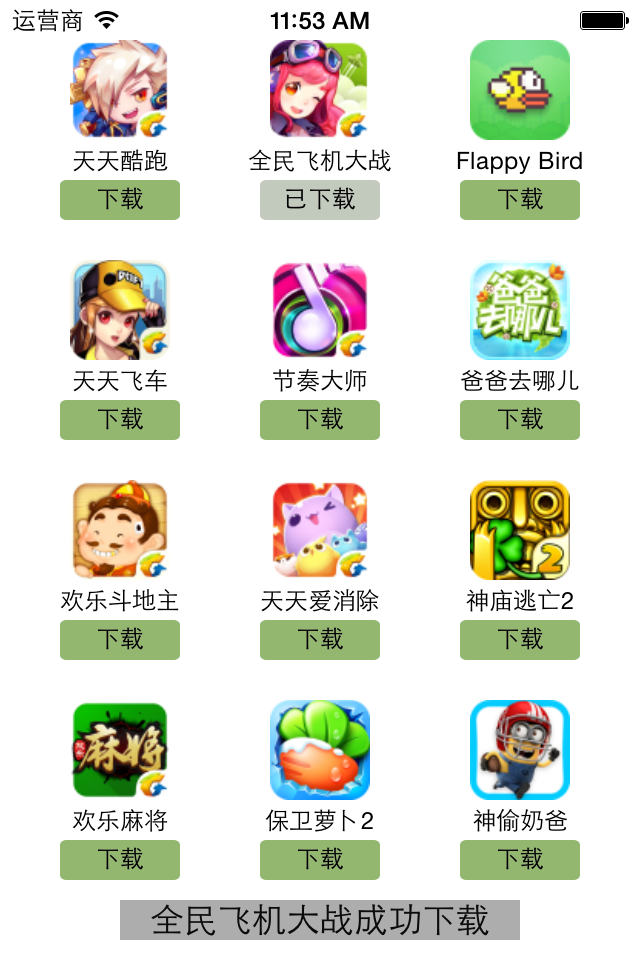
1 // 2 // YYViewController.m 3 // 12-视图改进(1) 4 // 5 // Created by apple on 14-5-25. 6 // Copyright (c) 2014年 itcase. All rights reserved. 7 // 8 9 #import "YYViewController.h"10 #import "YYappInfo.h"11 #import "YYappInfoView.h"12 13 @interface YYViewController ()14 @property(nonatomic,strong)NSArray *apps;15 @end16 @implementation YYViewController17 18 -(NSArray *)apps19 {20 if (!_apps) {21 _apps=[YYappInfo appinfoarray];22 }23 return _apps;24 }25 26 - (void)viewDidLoad27 {28 [super viewDidLoad];29 30 int totalloc = 3;31 CGFloat appviewW = 80;32 CGFloat appviewH = 90;33 CGFloat margin = (self.view.frame.size.width-totalloc*appviewW)/(totalloc+1);34 35 int count=self.apps.count;36 for (int i = 0; i < count; i++) {37 38 int row = i/totalloc;39 int loc = i%totalloc;40 41 CGFloat appviewX = margin + (margin + appviewW) * loc;42 CGFloat appviewY = margin + (margin + appviewH) * row;43 44 YYappInfo *appinfo=self.apps[i];45 YYappInfoView *appinfoview=[YYappInfoView appInfoViewWithappInfo:appinfo];46 appinfoview.frame=CGRectMake(appviewX, appviewY, appviewW, appviewH);47 [self.view addSubview:appinfoview];48 }49 }50 @end 实现效果:
4.补充说明
View的封装思路
(1) 如果一个view内部的子控件比较多,一般会考虑自定义一个view,把它内部子控件的创建屏蔽起来,不让外界关心
(2) 外界可以传入对应的模型数据给view,view拿到模型数据后给内部的子控件设置对应的数据
三、mvc机制简单说明

说明:
(1)在开发过程中,作为控制器处理的量级应该很轻,不该操心的不操心。协调好模型和视图就ok了,要学会当一个好老板。
(2)三个部分各司其职,数据模型只负责数据的处理,视图部分只负责把拿到的数据进行显示,两个部分都是被动的,等待着大管家控制器的调遣。
(3)在OC中,如果视图和数据模型之间有通道,那控制器是否处于失控状态呢?